pygame网络游戏_4_2:人物行走_角色移动效果
1.添加网格线
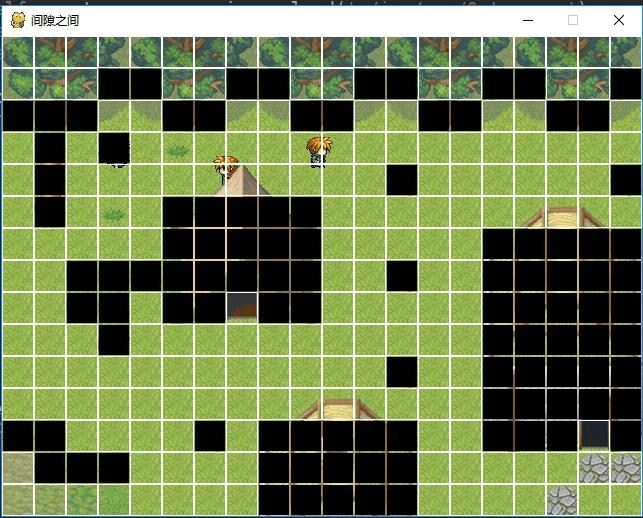
为了让大家能更直观的感受到地图是一个个小格子,我在GameMap类中又新增了一个绘制网格线的方法:
  def draw_grid(self, screen_surf):
    """
    画网格
    """
    for x in range(self.w):
      for y in range(self.h):
        if self[x][y] == 0: # 不是障碍,画空心的矩形
          pygame.draw.rect(screen_surf, (255, 255, 255), (self.x + x * 32, self.y + y * 32, 32, 32), 1)
        else: # 是障碍,画黑色实心的矩形
          pygame.draw.rect(screen_surf, (0, 0, 0), (self.x + x * 32 + 1, self.y + y * 32 + 1, 30, 30), 0)
功能很简单:不是障碍就绘制空心矩形,是障碍就绘制实心矩形。我们在绘图函数中调用:
  def update(self):
    while True:
      self.clock.tick(self.fps)
      # TODO:逻辑更新
      self.event_handler()
      # TODO:画面更新
      self.game_map.draw_bottom(self.screen_surf)
      Sprite.draw(self.screen_surf, self.hero, 100, 100, 0, 0)
      Sprite.draw(self.screen_surf, self.hero, 210, 120, 1, 1)
      Sprite.draw(self.screen_surf, self.hero, 300, 100, 2, 2)
      self.game_map.draw_top(self.screen_surf)
      self.game_map.draw_grid(self.screen_surf)
      pygame.display.update()

画风突然鬼畜起来了,哈哈~
其中黑色的格子就是障碍啦。
2.人物行走类
在寻路之前,先得把我们的行走功能(动画效果、人物面向)搞定。人物行走的逻辑相对之前的代码是要复杂一些的,所以动手写代码之前,得好好分析几个问题。
1.角色id:我们使用的是一张集成了所有角色的精灵图,但是不同的角色在图片中的位置都各不相同。这时,我们就需要一个角色id来确定每个角色在图片中的位置。如何优雅的设计人物id呢?我们先看一张图:

我将每一帧都进行了编号0~95。那么第一个角色的id就是0,第二个角色id是3,第三个是6,第四个是9,第五个是48...
可以发现,我把每个角色第一帧的编号当作了它的id,而不是直接让角色id按照1,2,3,4,5...的顺序排下去。
这样做的好处是什么呢?
我们来回忆一下之前封装的Sprite.draw:
draw(dest, source, x, y, cell_x, cell_y, cell_w=32, cell_h=32)
cell_x和cell_y代表精灵图中的列和行
所以,我们就可以直接通过角色id计算出角色第一帧的cell_x和cell_y。
cell_x=角色id%12 ,因为每行有12列,所以对12取余是列数
cell_y=角色id//12,每行12个,所以除以12就是行数
2.只算出来第一帧可不行,每个角色一共4*3=12帧,怎么确定角色当前是12帧的哪一帧呢?
我们可以用一个方向变量dir记录角色当前的方向,取值范围是0~3(一共4个方向),再用一个当前帧变量frame记录角色在当前方向的第几帧,取值范围是0~2(每个方向有3帧)。
所以角色在移动过程中的列和行就是:
cell_x=角色id%12+frame
cell_y=角色id//12+dir
3.人物移动逻辑
假设我们已知:1.角色在地图中的格子的行cur_my和列cur_mx 2.角色下一步将要去的格子的行next_my和列next_mx
那么角色当前的绘图坐标是:cur_x=cur_mx*32,cur_y=cur_my*32。
角色的下一步格子的绘图坐标就是:dest_x=next_mx*32,dest_y=next_my*32。
因为一个格子是32*32的,所以实际的绘图坐标需要*32。
然后,我们需要在游戏主循环里不断的去执行以下逻辑:
如果cur_x大于dest_x,那么cur_x-=2,其中这个2代表每次主循环角色移动的像素。
如果cur_x小于dest_x,那么cur_x+=2。
cur_y也是同理
当cur_x==dest_x并且cur_y==dest_y的时候,就代表角色已经移动到目标位置了。
理解了上面说的三个问题之后(没理解就配合下面的代码再思考一遍),我们就可以开始编写人物行走类了,在core.py中增加:
class CharWalk:
  """
  人物行走类 char是character的缩写
  """
  DIR_DOWN = 0
  DIR_LEFT = 1
  DIR_RIGHT = 2
  DIR_UP = 3

  def __init__(self, hero_surf, char_id, dir, mx, my):
    """
    :param hero_surf: 精灵图的surface
    :param char_id: 角色id
    :param dir: 角色方向
    :param mx: 角色所在的小格子坐标
    :param my: 角色所在的小格子坐标
    """
    self.hero_surf = hero_surf
    self.char_id = char_id
    self.dir = dir
    self.mx = mx
    self.my = my

    self.is_walking = False # 角色是否正在移动
    self.frame = 1 # 角色当前帧
    self.x = mx * 32 # 角色相对于地图的坐标
    self.y = my * 32
    # 角色下一步需要去的格子
    self.next_mx = 0
    self.next_my = 0
    # 步长
    self.step = 2 # 每帧移动的像素

  def draw(self, screen_surf, map_x, map_y):
    cell_x = self.char_id % 12 + int(self.frame)
    cell_y = self.char_id // 12 + self.dir
    Sprite.draw(screen_surf, self.hero_surf, map_x + self.x, map_y + self.y, cell_x, cell_y)

  def goto(self, x, y):
    """
    :param x: 目标点
    :param y: 目标点
    """
    self.next_mx = x
    self.next_my = y

    # 设置人物面向
    if self.next_mx > self.mx:
      self.dir = CharWalk.DIR_RIGHT
    elif self.next_mx < self.mx:
      self.dir = CharWalk.DIR_LEFT

    if self.next_my > self.my:
      self.dir = CharWalk.DIR_DOWN
    elif self.next_my < self.my:
      self.dir = CharWalk.DIR_UP

    self.is_walking = True

  def move(self):
    if not self.is_walking:
      return
    dest_x = self.next_mx * 32
    dest_y = self.next_my * 32

    # 向目标位置靠近
    if self.x < dest_x:
      self.x += self.step
      if self.x >= dest_x:
        self.x = dest_x
    elif self.x > dest_x:
      self.x -= self.step
      if self.x <= dest_x:
        self.x = dest_x

    if self.y < dest_y:
      self.y += self.step
      if self.y >= dest_y:
        self.y = dest_y
    elif self.y > dest_y:
      self.y -= self.step
      if self.y <= dest_y:
        self.y = dest_y

    # 改变当前帧
    self.frame = (self.frame + 0.1) % 3

    # 角色当前位置
    self.mx = int(self.x / 32)
    self.my = int(self.y / 32)

    # 到达了目标点
    if self.x == dest_x and self.y == dest_y:
      self.frame = 1
      self.is_walking = False
其中,self.x和self.y就是问题分析中的cur_x,cur_y。
在draw函数中,传入了两个参数map_x和map_y,这是地图的绘图坐标,我们的self.x,self.y都是相对于地图的,所以要加上地图绘图坐标才是实际的角色绘图坐标。
这个类的代码也不是很多,大家一定要理解透彻哦~
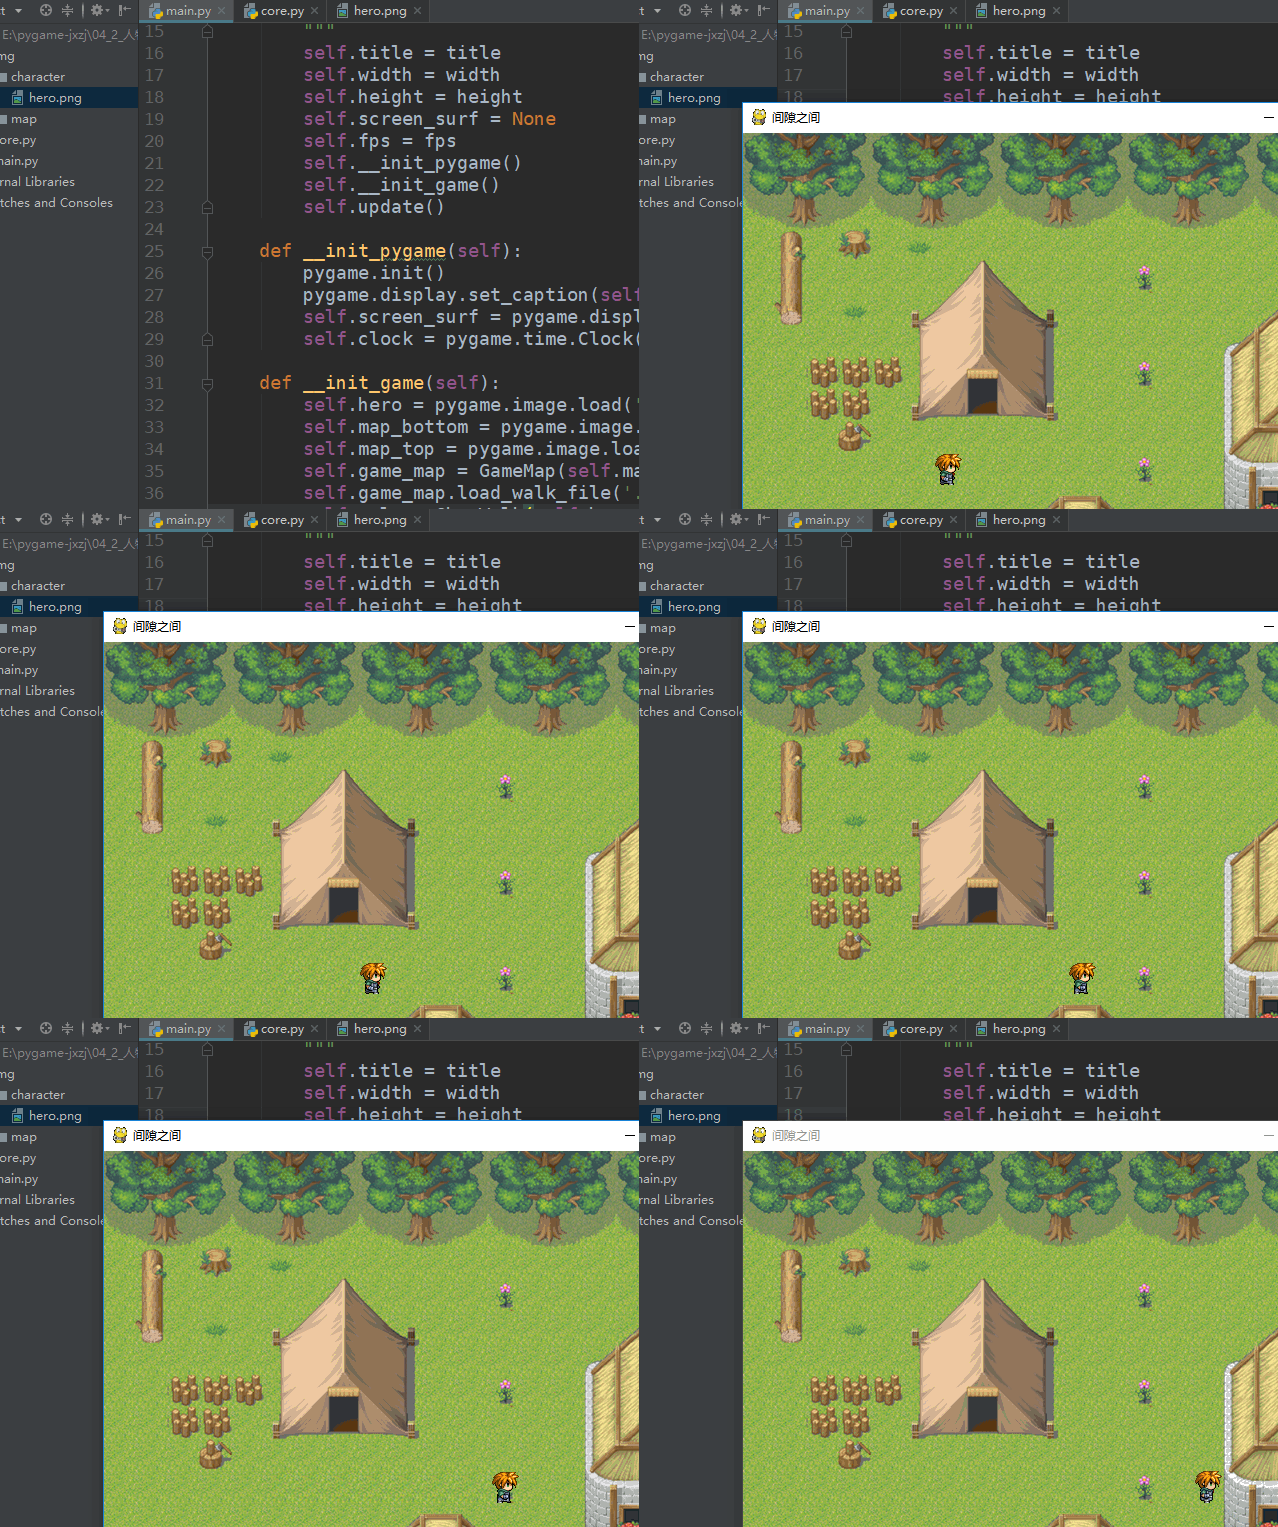
最后我们来看一下效果,让我们的0号角色从(5,10)走到(14,10):
在__init_game中创建我们的角色:
  def __init_game(self):
    """
    我们游戏的一些初始化操作
    """
    self.hero = pygame.image.load('./img/character/hero.png').convert_alpha()
    self.map_bottom = pygame.image.load('./img/map/0.png').convert_alpha()
    self.map_top = pygame.image.load('./img/map/0_top.png').convert_alpha()
    self.game_map = GameMap(self.map_bottom, self.map_top, 0, 0)
    self.game_map.load_walk_file('./img/map/0.map')
    self.role = CharWalk(self.hero, 0, CharWalk.DIR_DOWN, 5, 10)
    self.role.goto(14, 10)
别忘了,在绘图函数中显示角色:
  def update(self):
    while True:
      self.clock.tick(self.fps)
      # 逻辑更新
      self.role.move()
      self.event_handler()
      # 画面更新
      self.game_map.draw_bottom(self.screen_surf)
      self.role.draw(self.screen_surf, self.game_map.x, self.game_map.y)
      self.game_map.draw_top(self.screen_surf)
      pygame.display.update()
运行效果:

本章完,请完全理解本章内容后再继续阅读后续章节喔~
有问题可以直接在评论中留言。