HTMl5下拉框右边加图标的实现代码介绍
HTMl5下拉框右边加图标的实现代码介绍
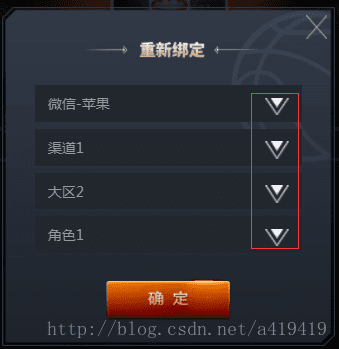
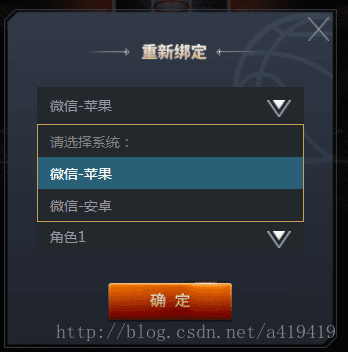
本文给大家讲h5、select下拉框右边加图标,深度美化页面增进用户体验效果
1.那么我们先来看一下效果吧!
2.再看看h5的结构:
<div id="login-div">
        <div class="select-wrapper">
          <select id="selector1">
            <option value="" disabled selected>请选择系统:</option>
            <option value="1">微信-苹果</option>
            <option value="2">微信-安卓</option>
          </select>
          <img src="ossweb-img/arrow.png" alt="" class="arrow" />
        </div>
        <div class="select-wrapper">
          <select id="selector2">
            <option value="" disabled selected>请选择渠道:</option>
            <option value="1">渠道1</option>
            <option value="2">渠道2</option>
          </select>
          <img src="ossweb-img/arrow.png" alt="" class="arrow" />
        </div>
        <div class="select-wrapper">
          <select id="selector3">
            <option value="" disabled selected>请选择大区:</option>
            <option value="1">大区1</option>
            <option value="2">大区2</option>
          </select>
          <img src="ossweb-img/arrow.png" alt="" class="arrow" />
        </div>
        <div class="select-wrapper">
          <select id="selector4">
            <option value="" disabled selected>请选择角色:</option>
            <option value="1">角色1</option>
            <option value="2">角色2</option>
          </select>
          <img src="ossweb-img/arrow.png" alt="" class="arrow" />
        </div>
        <p id="notice">单个帐号只能领取一次奖励</p>
        <img src="ossweb-img/comfire1.png" alt="" id="comfire1"/>
      </div>
3.样式部分是用了sass进行控制的,如果不会sass也可以换成css。没有什么特别的运算需要转化,所以换成css也简单
@function REM($n){
    @return $n/$REM*1rem;
  }
 #login-div{
    background: url(../ossweb-img/kuang1.png)0 0 no-repeat;
    background-size: 100% 100%;
    width: REM(564);
    height: REM(531);
    margin-left: REM(38);
    .select-wrapper{
      position: relative;
      display: flex;
      justify-content: center;
      align-items: center;
      height: REM(50);
      margin: REM(10) auto;
      padding-top: REM(15);
      &>select{
        width: REM(458);
        height: REM(63);
        padding-left: REM(20);
        border: 1px solid #23282d;
        background: #23282d;
        -webkit-appearance: none;
        color: #92989f;
        font-size: REM(24);
        margin-top: REM(75);
        border-radius: 0;
        z-index:10;
      }
      .arrow{
        position: absolute;
        width: REM(41);
        height: REM(30);
        top: REM(65);
        right: REM(80);
        pointer-events: none;
        z-index:11;
      }
    }
    #notice{
        font-size: REM(20);
        color: #92989f;
        text-align: center;
        margin-top: REM(75);
    }
    #comfire1{
        width: REM(220);
        height: REM(78);
        margin-top: REM(20);
        margin-left: REM(174);
    }
  }
4.解析:主要是.arrow这个元素进行右边那个图标的位置控制。利用position: absolute;这个属性控制好位置,就基本没有问题了。
总结
以上所述是小编给大家介绍的HTML5、Select下拉框右边加图标的实现代码,希望对大家有所帮助,如果大家有任何疑问请给我留言,小编会及时回复大家的。在此也非常感谢大家对路饭网站的支持!